Isometric graphics tutorial
Introduction
In this tutorial, we are going to load an isometric tilemap from a file and render it on the screen.
We will be looking at several techniques commonly applied in 2D games.
Loading maps
In the previous tutorial on scrolling, our tilemap was hard-coded as a two dimensional Lua table.
It worked for the purposes of the tutorial, but it is usually much more convenient to store maps and other game content separately from our code.
One approach is to save the tilemap as a plain text file where each character represents a tile.
As you may know, each ANSI character has a code that we can find in Lua, using the "string.byte" function.
The first 32 ANSI characters are non-visible, so our tilemap will be made up of characters starting from the 32-nd symbol onward.
The code for loading map files is fairly short.
It scans the input file one character at a time while tracking each character's position in map coordinates.
The x position increases by one for each consecutive character and the y position increases for each new line in the map file.
-- load and parse the map file
function loadFile(filename)
  local text = love.filesystem.read(filename)
  if text:sub(-1) ~= "\n" then
    text = text .. "\n"
  end
  local map = {}
  local x, y = 0, 0
  -- for each line
  for line in text:gmatch("(.-)\n") do
    x, y = 0, y + 1
    -- for each char
    local row = {}
    for ch in line:gmatch(".") do
      x = x + 1
      row[x] = ch
    end
    map[y] = row
  end
  return map
end
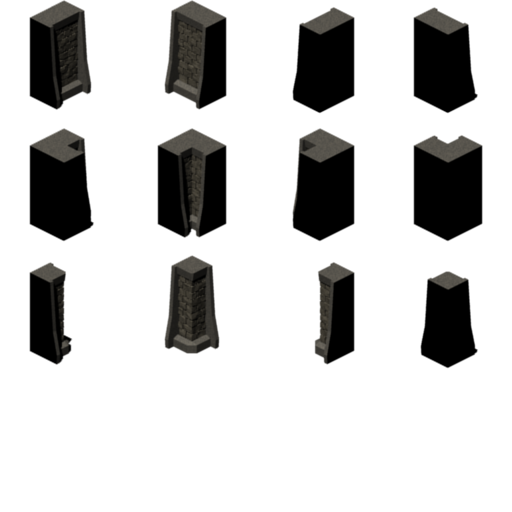
Tilesets
We have touched upon tilesets briefly in the previous tutorial on animation.
Tilesets are neat not only because you can store several of you image assets in one file, but also because you can later draw a particular tile from that tileset based on a number.
We will be implementing a piece of code which can draw the 1st, 3rd or any tile from the tileset.
You just have to make sure that your tiles are properly aligned within the tileset image.
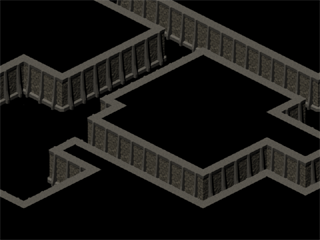
For the purposes of this example, we are using an isometric tileset with tiles that are 128 by 128 pixels in size.
Types of isometric maps
There are two types of isometric maps: diamond and staggered.
They differ in the way the tiles are ordered.
Diamond maps are aligned in the form a rhombus and it's the approach we'll be using in this tutorial.
The following code snippet shows how the on-screen position of tiles is calculated with diamond ordering (where 'tx' and 'ty' represent the tile index):
-- diamond ordering
local x = (tx + ty)*(tile_width/2)
local y = (ty - tx)*(tile_height/2)
Staggered ordering is preferred in strategy games (like Civilization 2 & 3) where the map is usually wrapped horizontally.
It should be noted that staggered maps add some additional complications in particular with finding the index of neighboring tiles.
Here is how tiles are placed on the screen with staggered ordering:
-- staggered ordering
local x = tx*tile_width + ty%2*(tile_width/2)
local y = ty*(tile_height/2)
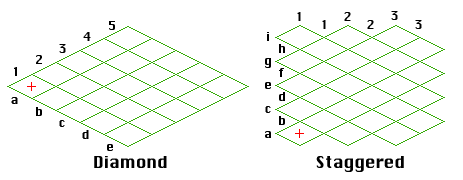
Figure 1: Diamond vs staggered isometric tile ordering. The red cross shows the origin point (0, 0)
Mouse coordinates to tile index
Next, we're going to figure out how to select tiles from the map using the mouse.
The basic problem is converting an arbitrary point on the map to a tile index.
For 30-degree tiles, this can be calculated using some basic math.
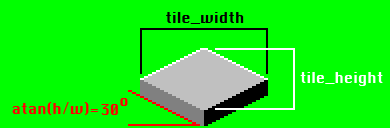
Figure 2: Isometric tile with 30-degree tilt
-- diamond ordering
local ty = my - mx/2 - tile_height
local tx = mx + ty
local y = math.ceil(-ty/tile_width)
local x = math.ceil(tx/tile_width) + 1
-- staggered ordering
local ty = my - mx/2 - tile_height
local tx = mx + ty
ty = math.ceil(-ty/(tile_width/2))
tx = math.ceil(tx/(tile_width/2)) + 1
local x = math.floor((tx + ty)/2)
local y = ty - tx
Some modifications may be necessary to both examples after you paste them in your code.
Firstly, mx and my are assumed to be coordinates on the map (not the screen).
Another thing to note is that both scripts assume that the first tile (1, 1) is on the bottom left for staggered ordering or the left corner of the diamond.
Isometric graphics and z-ordering
With isometric graphics, we generally want to render tiles in the first row of the tilemap behind those in the second row and so on.
To find the proper depth of each sprite, we can simply negate its y-position.
As a result, the top rows of the tilemap have greater depth and are therefore rendered behind the lower rows.